Water damage in ceiling repair requires a systematic approach that begins with identifying the leak source, progresses through damage assessment, and finishes with proper restoration to return your ceiling to its original condition. Whether you’re dealing with a roof leak after heavy rain, burst pipes in an upstairs bathroom, or a slow plumbing issue that has caused gradual deterioration, understanding the complete repair process ensures you address both visible damage and hidden problems that could lead to mold growth or structural failure.
This guide covers emergency response procedures, damage assessment techniques, step-by-step repair procedures, and prevention strategies for homeowners, property managers, and DIY enthusiasts facing ceiling water damage. It also addresses what tenants should do if a ceiling collapses in an apartment, including immediate safety steps, notifying the landlord, and when to seek legal guidance after injuries or property damage.
Understanding Ceiling Water Damage
Ceiling water damage occurs when moisture intrudes into your ceiling materials—typically drywall, insulation, and structural components—causing material deterioration, structural weakening, and potential health hazards from microbial growth. This damage directly threatens both your immediate property safety and your home’s long-term value, making prompt identification and proper repair essential.
Types of Water Damage
Clean water damage originates from supply-line leaks, roof infiltration during heavy rain, or condensation. This category presents the lowest health risk and is most suitable for DIY repairs when caught early.
Gray water damage comes from appliance overflows, shower or drain backups, and HVAC condensation issues. This water may contain contaminants requiring additional sanitization during repairs.
Black water damage results from sewage backups or flood water containing dangerous pathogens. This category requires specialized handling: wear protective gear and consider professional restoration services for any black water exposure.
Damage Categories and Severity
Surface-level damage affects only paint and minor areas of drywall, presenting as water stains, peeling paint, or slight discoloration. These repairs typically involve spot treatment and repainting without replacing structural materials.
Moderate damage penetrates insulation and the ceiling structure, causing sagging sections, bubbling texture, and potential mold behind the damaged portion. This level requires removing affected materials and installing proper moisture barriers before repair.
Severe damage demands full ceiling reconstruction and mold remediation, often involving the entire ceiling section between joists. Structural assessment becomes critical, and professional assistance may be necessary to ensure safe, code-compliant repairs.
Identifying and Assessing Ceiling Water Damage
Accurate damage assessment prevents incomplete repairs that allow hidden moisture to cause further damage, mold growth, or recurring problems.
Visual Warning Signs
Water stains appear as brown or yellow rings on your ceiling, indicating either active or past leaks. Fresh stains feel damp to the touch, while older stains may appear dry but still warrant investigation for hidden damage behind the surface.
Peeling paint, bubbling texture, and surface material deterioration signal that moisture has penetrated beyond the paint layer into the drywall substrate. These visual cues often indicate damage more extensive than what’s immediately visible.
Sagging ceiling sections represent a serious structural compromise where waterlogged drywall has lost its integrity. Visible cracks radiating from damaged areas suggest stress on surrounding materials that may require a larger repair area than initially apparent.
Hidden Damage Indicators
Musty odors in rooms below the damaged ceiling suggest mold growth behind ceiling materials. Even when visible damage appears minimal, persistent odors warrant investigation by cutting a small access hole to inspect the cavity above.
Increased utility bills may indicate insulation damage and air leaks resulting from water infiltration. Wet insulation loses its thermal properties and can retain moisture, creating ongoing problems even after the ceiling appears dry.
Electrical issues near water-damaged areas—flickering lights, non-functioning outlets, or tripped breakers—signal moisture affecting wiring and fixtures. Turn off power to affected circuits before any inspection or repair work.
Professional Assessment Tools
Moisture meters measure water content in ceiling materials, distinguishing between truly dry surfaces and those retaining hidden moisture. Pin-type meters provide readings at specific points, while pinless models scan larger areas quickly.
Infrared cameras detect temperature differences that reveal hidden wet areas and active leaks invisible to the naked eye. These tools identify the full extent of moisture penetration, ensuring your repair addresses all affected areas.
Air quality testing detects mold spores and contaminants that may have developed in ceiling cavities. For moderate to severe damage, testing before and after repair confirms successful remediation.
Ceiling Water Damage Repair Process
Armed with thorough assessment findings, you’re ready to begin the systematic repair process that moves from emergency response through complete restoration.
Emergency Response and Source Control
Immediate action within the first 24-48 hours dramatically reduces the extent of damage and prevents mold growth, which can begin within 48-72 hours of water exposure.
- Locate and stop the water source by closing shutoff valves for plumbing leaks, or by applying temporary roof patches with tarps anchored by weighted boards for roof leaks. If the leak originates from an upstairs bathroom, check the toilet wax seal, shower pan, and supply lines.
- Remove standing water and place buckets or large pans under active drips. Lay towels around floor areas to prevent overspray damage. If water has begun to pool on the ceiling surface, carefully puncture the lowest point with a small hole to control drainage into a container.
- Document damage with photos for insurance claims before beginning cleanup. Capture wide shots and close-ups of all affected areas, water stains, and any visible mold.
- Ensure electrical safety by turning off the breaker serving the affected ceiling fixtures. Do not operate switches or fixtures in wet areas until a professional can assess the wiring.
Repair Method Comparison
| Criteria | DIY Repair | Professional Repair |
|---|---|---|
| Cost Range | $100-%500 materials | $800-$3,000 full service |
| Time Required | 3-7 days including drying | 1-3 days with industrial equipment |
| Equipment Needed | Basic tools, rental fans | Industrial drying, specialty tools |
| Best For | Minor surface damage | Moderate to severe damage |
| Skill Level | Comfortable with drywall work | Any experience level |
Choosing your approach: Start small repairs yourself if the damage is limited to a single section and no mold is present. For damage spanning multiple joists, showing signs of mold growth, or involving compromised structural elements, professional restoration offers faster, more reliable results. Insurance claims often cover professional services for significant water damage.
Material Removal and Preparation
Identify the damaged portion by probing the ceiling with a screwdriver—soft, spongy areas indicate compromised drywall requiring removal. Mark cut lines along joists to provide solid mounting surfaces for replacement material, using a stud finder to locate framing.
Remove all wet and damaged drywall using a drywall saw, cutting cleanly along your marked lines. Pull down damaged insulation and dispose of any materials showing mold or persistent moisture. Wear protective gear, including an N95 mask, safety glasses, and gloves, during removal.
Dry the exposed cavity completely before proceeding. Position fans to circulate air through the opening, and use a dehumidifier to reduce ambient moisture. A heat gun can accelerate drying in specific areas. Verify dryness with moisture meters before installing new materials—readings should match those from nearby dry, undamaged areas.
Installing Moisture Barriers and New Materials
Install a vapor barrier before new drywall in moisture-prone areas. A 6-mil polyethylene sheet should fully cover the exposed joist bays with overlapping seams sealed using vapor-barrier-rated construction tape. Seal around any pipe, electrical, or fixture penetrations.
Cut water-resistant (MR-grade) drywall to fit your opening precisely. For ceiling applications, 5/8” thickness provides better sag resistance than standard 1/2” panels. Measure twice and cut once—an accurate fit simplifies finishing work.
Install the new drywall patch using 1½” coarse-thread drywall screws spaced approximately 12” apart along joists. Countersink screw heads just below the surface without breaking the paper face. Verify flush alignment by tapping the patch with a screwdriver handle—any high or low spots will telegraph through the finished surface.
Finishing and Texture Matching
Apply a thin bed of all-purpose joint compound along seams using a 6” taping knife, then embed paper drywall tape centered over the joint. Hold the knife at approximately 30° to press mud beneath the tape and flatten the surface. Cover screw heads with compound as well.
Allow 8-12 hours drying time between coats. Apply a second coat with an 8” knife, feathering edges 2-3” beyond the first coat. Sand smooth after drying and clean thoroughly to remove all dust.
Prime the repair with stain blocking primer to prevent water stain bleed-through and ensure proper paint adhesion. Standard primers may allow old water stains to show through your finished paint.
Match existing ceiling texture before painting. For skip-trowel or knockdown textures, practice on scrap drywall first—speed, trowel angle, and pressure all affect the final appearance. Apply texture, allow to dry completely, then prime again if needed before final paint application.
Common Challenges and Solutions
Even well-planned repairs encounter obstacles. These solutions address the most common problems homeowners encounter during ceiling water-damage repair.
Hidden Mold Growth
Mold can develop behind ceiling materials even when surfaces appear dry, especially if the original leak went undetected for weeks. Apply antimicrobial treatments to all exposed framing and ensure complete drying—verified by moisture meters—before sealing repairs. For contamination covering more than 10 square feet, or if occupants have respiratory sensitivities, professional mold testing and remediation provide safer, more thorough results.
Matching Existing Ceiling Texture
Texture mismatches make repairs obvious and diminish the quality of your work. Practice your technique on sample boards cut from the same thickness of drywall as your ceiling before applying it to the repaired areas. For complex patterns like popcorn or elaborate knockdown, professional texture matching often costs less than the frustration of multiple DIY attempts. Some contractors specialize in texture-matching for patch repairs.
Recurring Leaks After Repair
A perfect ceiling repair means nothing if water returns. Thoroughly inspect and address root causes, including missing or damaged roof shingles, worn plumbing fittings, deteriorated toilet wax seals, and HVAC condensation drain issues. Install water detection sensors near common leak points—under upstairs bathroom fixtures, near water heaters, and in attic spaces. Establish regular maintenance checks for your roof, plumbing, and HVAC systems to catch problems before they damage your new ceiling work.
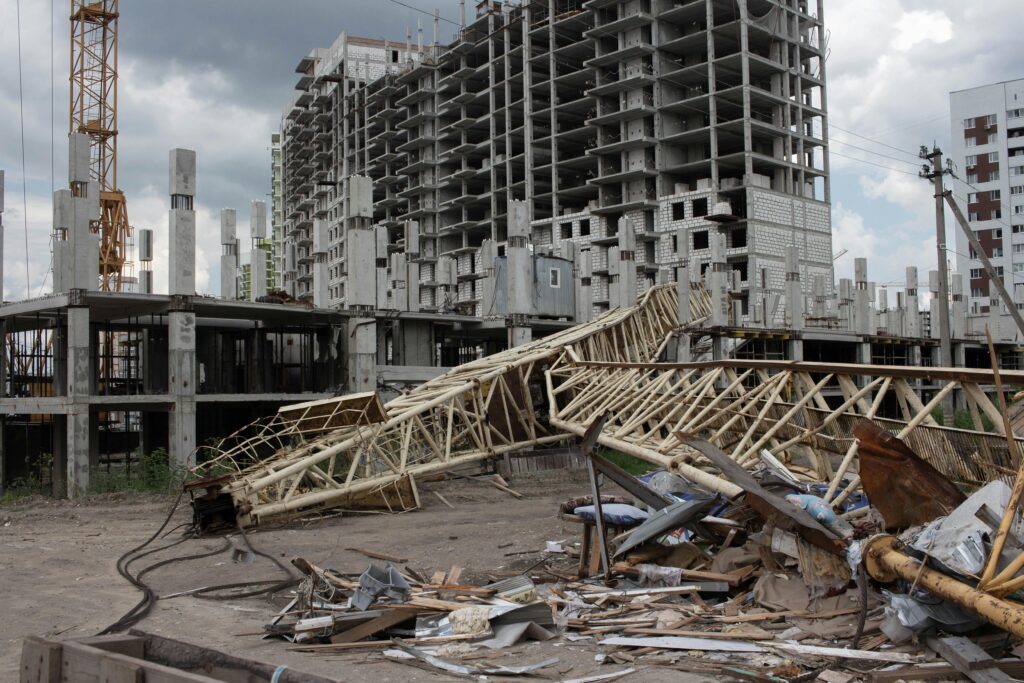
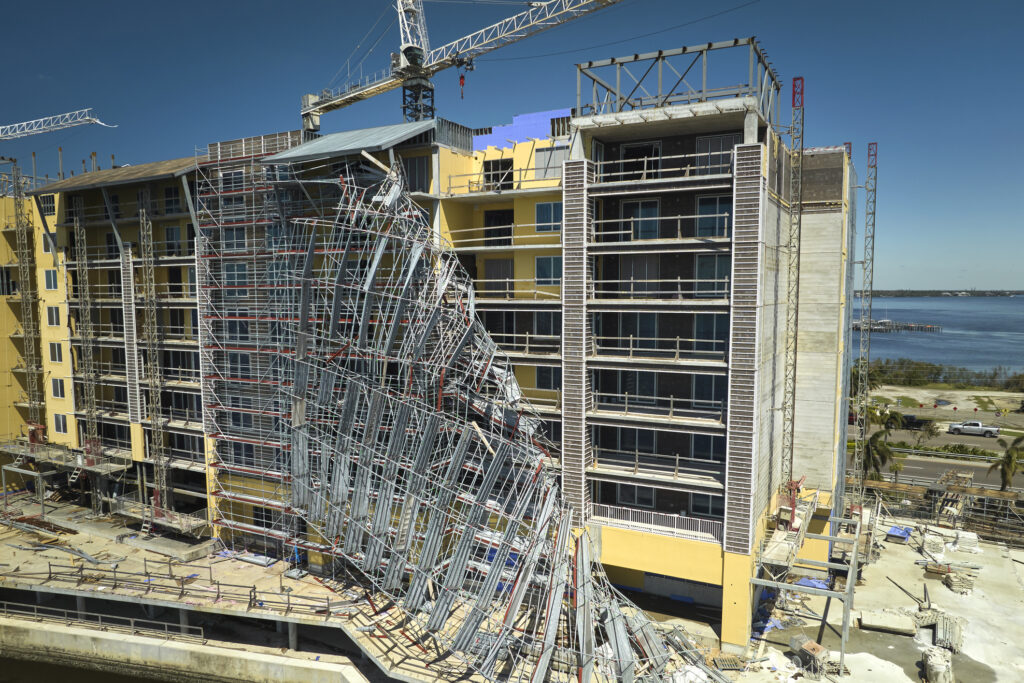
When Ceiling Water Damage Occurs in Apartments: Tenant Safety and Landlord Responsibility
If water damage in an apartment causes a sagging or collapsed ceiling, it is typically the landlord’s responsibility to address the issue promptly, as it affects the unit’s habitability and structural safety. Tenants should immediately notify the landlord or property manager as soon as they notice active leaks, water pooling, sagging drywall, or any signs of collapse so repairs can be made and further damage prevented.
In situations where the ceiling collapses or causes injuries, damage to personal property, or displacement from the unit, tenants should prioritize safety and seek medical attention if needed. At that point, it may also be appropriate to contact an attorney who specializes in landlord-tenant law or premises liability to understand rights, document damages, and pursue compensation if negligence or delayed maintenance contributed to the incident.
Contact Law Office of Nicholas E. Tzaneatas
Experienced NYC ceiling collapse attorney Nicholas E. Tzaneatas knows the rights of tenants and can be your strong advocate to make sure the landlord and/or the city are held responsible for all damages and injuries. We have worked on and won cases for clients with collapsed ceilings.